Showing posts with label repurposing. Show all posts

Home-made shadow box or memory box for Box Assemblage Art


Box Assemblage in its original expression is an artistic grouping of two and/or three dimensional collage made up of found objects placed within the confines of a box.  Often the box and its objects contain a specific narrative, pay homage to an idea or person, or pictorially represent a memory.  The most famous of the Box Assemblage artists was the New Yorker, Joseph Cornell (1903-1972), who created 'worlds within boxes', initially just to entertain both himself and his brother. Using pallet wood and discarded window glass to create the box within which to assemble the objects, seemed to us a great way to continue the theme of reuse, repurposing and recuperation, which lies at the very heart of the genre.

Element from box assemblage - clay and watercolour fishing basket

This like many of our projects is a joint adventure in which Sue and I pool our resources, this time to create an assemblage box for a gift. We've made several of these for our own house too, in particular the alternative to the bathroom cabinet  and the rather whimsical triptych on our rural seaside life.


Assemblage box made from paper ephemeraFound objects from beaches in an assemblage box


We store up ideas in cardboard boxes, for use later - usually in Winter, when we actually live in the house rather than the garden and/or workshops! Below is an idea with the working title Our Bird Box, which will feature some of Sue's collection of cock's eggs and moulted feathers she has collected over the years.


Moulted feathers, cock's eggs, serviettes and photos of our hens

If you are interested in the roots of Box Assemblage and the life and work of Joseph Cornell there is a great documentary Worlds in a Box narrated by the late Tony Curtis, himself an aficionado and artist of the genre.  You can find it on Youtube.

A word about using old glass


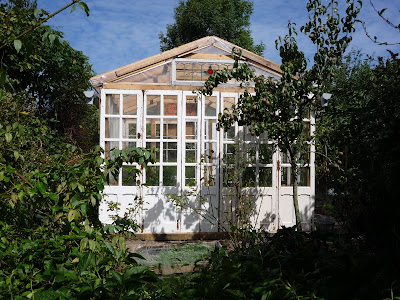
In our box design we incorporated glass from windows we source from a local joiner. Much of this collection has been used to glaze our house and make greenhouses. In the older windows, the glass contains imperfections of manufacture, ripples and bubbles, features which only add to its appeal for use in artistic projects. This does however, make it more difficult to cut, so in the true spirit of Box Assemblage, the size of the glass dictates the size of the box and thus creates the restrictions of the 'world' in which to assemble the found objects. Assemblages are often on-going projects, so starting with the glass and then slowly building up a collection can make for an organic process and a very satisfying final effect. Similarly, we incorporated a hinged lid, which could allow for opening and adding to the project.

Preparation of the planks


Select planks of the same thickness, which are the best looking and the least damaged.  For the back of the box we used some tongue and groove, which had been thrown out at one of our neighbouring DIY stores but pallet wood would be fine. Some of the pallet wood I had selected for its appearance was warped, which is quite a common occurrence with pallets.


I started by planing the upper and lower faces of the pallet wood plank. Once I had the smooth planed face of the wood, I could then proceed to deal with the warped edges.


I attached a straight edge to the planks and ran them through my home-made router table. The straight edge ran along a guide after which I could then remove the straight edge, turn the plank over and use the new straight edge of the plank against the guide to repeat the process on the other edge.


Construction of the lid


I removed the glass from the window and cleaned the putty from the edges with a sharp knife.


On measuring the glass thickness, I found that my circular saw would cut a groove of adequate width to fit. I then cut the groove in two of the planed planks and then cut strips from them to make framing material.


The sawn edge of the grooved strips was 'cleaned' using the router.


The strips were cut to length to fit the glass and I decided to have mitred (picture frame) corners, so I used my home-made hand sander to tidy up the cut ends.


The frame was glued together around the glass and I used a frame clamp to hold everything together whilst it dried.


Assembling the box and the box assemblage


The walls were assembled using butt joints, glued and nailed. The rear face of tongue and groove was stapled in place thus reinforcing and stiffening the structure.


For the box assemblage we used found objects, plus I fabricated certain others from scrap metal, pallet and fruit-crate wood and bamboo and Sue also made items in modelling clay, which she painted with ecological paints and water colours. The assemblage was then first planned and then finally glued with hot melt onto the back wall of the box, which had firstly been lined with selected papers and sheet music. The whole idea was to  create an amusing, eclectic composition with a dash of surrealism.


As you will no doubt have guessed the box was made for someone who is a hunter-gatherer and who has also been an artisan baker with a prize recipe for a traditional  regional dish. He is also a fellow devotee of pallet repurposing!


I fitted two recuperated hinges and a catch fashioned from a piece of wood and the box was ready for its lid.


And now, if you'd like to, sit back and watch the film:


Thanks for dropping by and feel free to comment and/or share this article. Hope to see you next time. Cheers, Andy

© Andy Colley 2014

How to Make a Simple Fuelless Cooker or Hay-box - No Power? No Worries. Hot Food.

Here's a quick and easy way to use less fuel, less water and still have a tasty and nutritious meal from a cardboard box. Get one ready in case of power outages or for hot food on a journey or emergency.


The Hay-box or fuelless cooker was a popular item around the turn of the 19th to 20th century. In particular during the World Wars and the Great Depression when people were often displaced and the price of fuel rose steeply and/or was rationed. Furthermore, it provided a form of cookery which used less water and in which, precious food, cooked at an even temperature by residual heat had no chance of burning and becoming spoiled. There was also the added and important factor that nutrients were retained through the slower and lower cooking times and temperature.


We cook all our meals and heat water with our wood-burning cooker. In the colder weather it is alight most of the day heating the house as well. As we move into the milder weather we tend to eat more raw food and as we have no need of the heating so the cooker is alight just around meal times. This poses a problem in that we do need hot water for washing hands when we come in from the garden prior to preparing our food .


We solved this problem by using a Hay Box to keep the water, heated at meal-times, hot. We made our first box from scrap wood and filled it with organic lucerne hay which we are given by the organic dairy farmer from whom we buy our chicken grain.

The idea is not a new one, in our 1920’s copy of Mrs Beeton's Book of Household Management the Fuelless cooker was used to cook meals for a fraction of the fuel cost. Nowadays it is just as important to consider the fuel-saving benefits of such a system as well as bearing in mind the possibility of providing hot food during power outages in the colder weather.
 

The principle is that the heated food is placed, in its pot or saucepan, into a well-insulated box , the lid which is also insulated is put in place and that’s it! The food takes about 4 times longer to cook completely within the box and may need to be reheated prior to serving but the only  energy consumed has been that needed to get it to boiling point. Of course, the ‘box’ part of the system is only required for safety and neatness and possibly transporting, I know of others that have simply wrapped duvets around the heated pan and achieved the same end result and have a warm duvet to boot!


ORGANIC LUCERNE HAY

ORGANIC TRITICALE STRAW

ORGANIC VEGETABLE FIBRES

ORGANIC HEMP AND LINEN

HOLZFLEX WOOD FIBRE

ORGANIC SHEEP'S WOOL


I used an ecological, non-toxic insulation for my box and there are a multitude of suitable insulation you can use: fleece material, multiple layers of corrugated cardboard, hay, straw even expanded polystyrene, the choice is yours. 

The first box I’ll share is the simplest and cheapest. We are very fortunate in having a local ecological building supplies company (in fact it’s next door to our organic supermarket) and I could buy single panels of  wood wool insulation 30mm thick for around $3,00. On  the same visit to buy the insulation we popped into the organic shop and picked up two cardboard boxes of similar proportions but different sizes. 


The insulation needs to be cut to line the four sides and base of the larger box and the smaller box should fit in the cavity that remains. I was able to find cartons whose sizes differed by about 60mm hence the 30mm insulation on the inside walls of the larger carton would be sufficient to form the space for the smaller carton.


To make the lid to the Hay Box I cut two rectangles of cardboard to the size of the larger carton and made a ‘sandwich’ with the insulation between them. The lid was held together with broad masking tape. I adhered the tape around the perimeter of the lid so as to seal in the insulation.


And that’s it, the box is ready to go. When the saucepan is put into the box, the voids at the box corners can be filled with triangular-shaped pieces of cardboard (a bit like ‘Toblerone’ boxes) or stuffed with tea towels, ideally any kind of insulating material which will reduce heat loss due to convection currents.


Next time I’ll share  my design for a wooden hay box, more robust than the cardboard one it is more suitable for carrying hot contents in a car so you can enjoy your own hot food on a journey.


Meanwhile, if you'd like to, sit back and enjoy the film:


Thanks for dropping by and please feel free to share this article, comment, ask questions and if you'd like to be assured of getting the next post, then sign up to follow this blog.

All the best, Andy

© Andy Colley 2014


Make a Pallet Wood Creel or Overhead Drying Rack for Clothes, Herbs and Flowers


Cheap and cheerful engineering in the practical use of recycled, untreated pallet and fruit crate wood to make a pulley creel/dryer.


I had two main reasons for making this drying rack, firstly because our teatowels were getting singed on the woodburner and secondly we had a huge crop of chillies to dry and store.

However, this rack, which in the Winter we use to dry clothes, could be made at least twice the size and give ample room to dry all your washing. I decided to go the whole hog and fabricate the pulleys. It was not as hard to make them as I had supposed. Even if you are just starting out in woodworking I think you will find that you will be able to make them quite easily by just following the steps set out below.


If you decide, as I did,  to cut the clothes rails down from pallet wood planks, then I would recommend using a circular saw. Alternatively you could buy three broom stales or wooden dowels (the former I could get here for 1 Euro each) but I enjoy the challenge of making everything from recycled wood! 


You will also need a set of hole saws to make the different components of the pulleys, these are inexpensive and usually easy to find as they are commonly used to cut large diameter holes for electrical installations. They are also a good investment as they provide a cheap alternative to buying expensive, large size wood drill bits. You often find them included in drill sets. My set of seven hole saws was included in a set of drills and the  collection cost 12 Euros.


Step One - Making the Pulley Wheels & Housing with some tips on sourcing fruit crate wood


I chose a specific fruit crate wood, which is 3 ply, these are quite common and are usually for transporting oranges and other heavier fruit and vegetables. The side and end pieces are wide enough to be very useful in all kinds of projects. Keep a good look out for these particularly now in the marmalade orange season!


Robust 3 ply fruit crate wood, or in this case a potato box.


Cutting out the basic pulley components


From a pallet wood plank cut 3 discs at 50 mm diameter.


From a fruit crate (orange box) cut 5 discs at 60 mm diameter. 


 Drill out central hole to dowel diameter.


Assembling the pulley components


You will be making two pulleys, one single and one double. The double pulley maintains the separation of the cord attached to each end of the rack and combined with the single pulley enables the free running of the cord.


Starting with the single pulley, glue both faces of the smaller pallet wood wheel and attach to the faces of the larger fruit crate wheels. To ensure correct alignment of the central hole, insert the dowel shaft prior to clamping (do not glue this).


Clamp and leave to dry as per Manufacturer's instructions for the glue you are using.


 Repeat for the double pulley.


Making the pulley housing


Each pulley housing comprises a base and two sides. They are made from pallet wood and I shaped the ends to make them more aesthetically pleasing but there is no need to do this.


Cut 4 sides and cut 2 bases. The base should be slightly wider than the pulley. Drill hole for dowel and having marked base thickness on sides, drill clearance holes for screws.


Glue and


screw


Prior to screwing the second side, fit the pulley on its shaft into the housing to ensure shaft alignment


Step Two - Making the Rack. Cutting out the basic components


I used a coat hanger as a pattern for the end plates of my rack.


Cut two end plates from a pallet wood plank.


Cut the square section rails from pallet wood.  Each end should be shaped to fit the holes you will drill in the end plates. I used a penknife to shape the rail ends.


Step Three - Assembly


Glue and if you want to, though not necessary, clamp.


Mount pulleys to ceiling joists, sit back and watch it on film.


If you have enjoyed this article and found it interesting then share it with your friends on social media or suchlike. Please also feel free to ask questions and or make comments and if you found this helpful and would like to support this site you can always Buy Me a Coffee at ko-fi.com =$3.

Until next time and from a sunny day in Normandie,

Cheers, Andy
© Andy Colley 2014
RETURN TO GREEN LEVER CONTENTS PAGE FOR MORE ARTICLES 

Home-made low cost pallet wood greenhouse, viable, safe, year-round food production.

The following article goes into detail on materials, uses, modifications and upgrades to suit your needs, budget and woodworking experience. 

The 5 Euro/Dollar/Pound Greenhouse...


its organic produce..

Home-made low cost pallet wood greenhouse - $5
Good companions, Courgettes and Tagetes erecta

its tenants..


We use our organic poultry to weed a control pests in the greenhouses. Depending on the scale of the job we alternate between the chickens and the quail. Above, Vladamir, Diavolo and Co., pretending not to notice that the quail have a big heap of compost to play in. At the end of the courgette season the quail move in to clean up the woodlice from the rotted compost so that we can plant the next lot of vegetables.

and its next lot of produce..
  

In line with tradition, we planted our garlic on the shortest day and harvested it on the longest.


Build a greenhouse to suit your budget

Anybody with the ability to assemble flat pack furniture can get to grips with this design in its cheapest form.

Home-made low cost old window glass and pallet wood greenhouse


We designed three models of greenhouse, which were made on the same principles of construction. The most expensive (left), made from recycled glass windows and pallet wood, will cost more if you purchase the leaded light and wooden posts. Our cost was 50 Euros but I estimate it would cost around 100 Euros if you needed to purchase the above items.

With water shortages, uncertain weather and continuing fallout from Fukushima, you can provide your family with year round vegetables, fruit, herbs and flowers. The 7 Euro Greenhouse incorporates an old glass window and has purchased polythene on all sides. In Summer, its gable ends and door panels can be swapped for wire mesh, to allow for  ventilation.Home-made low cost old window glass pallet wood greenhouse


The glass greenhouse has walls made of recuperated windows, is more robust and remains warmer longer, once heated by the sun. With the addition of fleece covers, we can grow more tender vegetables throughout the year. In addition we can grow medicinals and tropicals. For more information see link at end of this article.
Start small - work up!


Our first design - the 5 Euro Greenhouse is still up and running after 4 years and a couple of mini hurricanes as well as deep snow.

Home-made low cost pallet wood greenhouse $5 greenhouse

Materials - Pallets

For the sides and door: I used 6 of the pallet wood shelving frames (illustrated below), which if you can't get you can make from 5 standard pallets (120cm x 80cm), this would mean 3 sections each side rather than 2 in my design.
For the roof trusses: 4 standard pallets
For the bottom rails to allow raised beds: 1.5 standard pallets
To make the jig for the trusses: 2 standard pallets

Home-made low cost pallet wood greenhouse - pallets


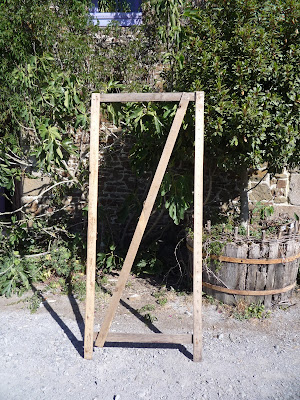
The greenhouse walls were made using the vertical uprights taken from a set of pallet shelving which originally had served to hold pot plants. They were 80cm wide and 170cm tall. I was able to recuperate some wire fencing from our local dump and cut it to fit these rectangular frames. I have since recuperated several of these shelving systems so they seem to be a standard throw-away pallet item. If however, you can not get hold of them just use your stock of pallet wood to create something similar. I used four of these frames (shown opposite) for the side walls and two more for the door and end wall.


Mass Production: Home-made pallet jig

Home-made low cost pallet wood greenhouseThe first thing I always consider, in a design of this sort is to create a way of getting a uniformity of construction. This is not just for aesthetics but because it makes everything easier when you come to fit the project together! To this end I set up a simple jig - out of pallet wood of course!

Make a cheap but robust pallet wood greenhouse

To fabricate the 5 identical roof trusses needed for this design, I constructed a jig from two pallets joined together to create a work-surface of roughly 2.40m in length. Wooden blocks were then screwed at key positions so as to act as 'stops' when the truss components were laid onto the pallet.

Something perhaps not so obvious in the Youtube film, is that my design incorporates a vertical piece of wood at the lower end of each truss. This enables each truss to be fitted to the inside face of the greenhouse wall. Once screwed into place, this addition prevents the tendency for the truss to move outwards. I felt that this vertical piece of wood, pushing against the inside face of the greenhouse, would be more secure than just relying on a screw or nail to hold the truss in place.

Once attached to the opposite walls the trusses were joined to each other at the side of the roof apex using pallet wood planks. This way of linking each truss means the whole roof structure becomes stiffer and provides a 'smooth' surface for the polythene roofing at the apex. See photo above.


To upgrade the 5 Euro Greenhouse, purchase some horticultural grade 200 micron polythene for around 30 Euros.

Pallet wood greenhouse design and construction

Our Little Helpers

And now if you'd like to, sit back and watch the film:


RELATED PROJECTS with live links to our detailed articles


If you're feeling more ambitious and have a good local source of discarded glass windows, then you might think of building our Glass Window Greenhouse 


Our Pallet Wood Chicken Coop - Hen House design and construction. This is also a prototype Tiny House and can be made in kit form and transported easily to where needed.


Our Dry Toilet System Save water, save money and make yourself some great compost!

Wheelbarrow rebuild using pallet wood

I made a pallet wood replacement for our wheelbarrow and it served its purpose for about 8-10 years. During the last few months of life, I could see the inherent mechanical weaknesses in my version and so as the frame and wheel were still in running order, I determined...read more


All the best and thanks for dropping by. Please feel free to share this article, comment and/or ask for further information.

Cheers, Andy
© Andy Colley 2014

Including more greenhouse projects)