
THE ROOF
The
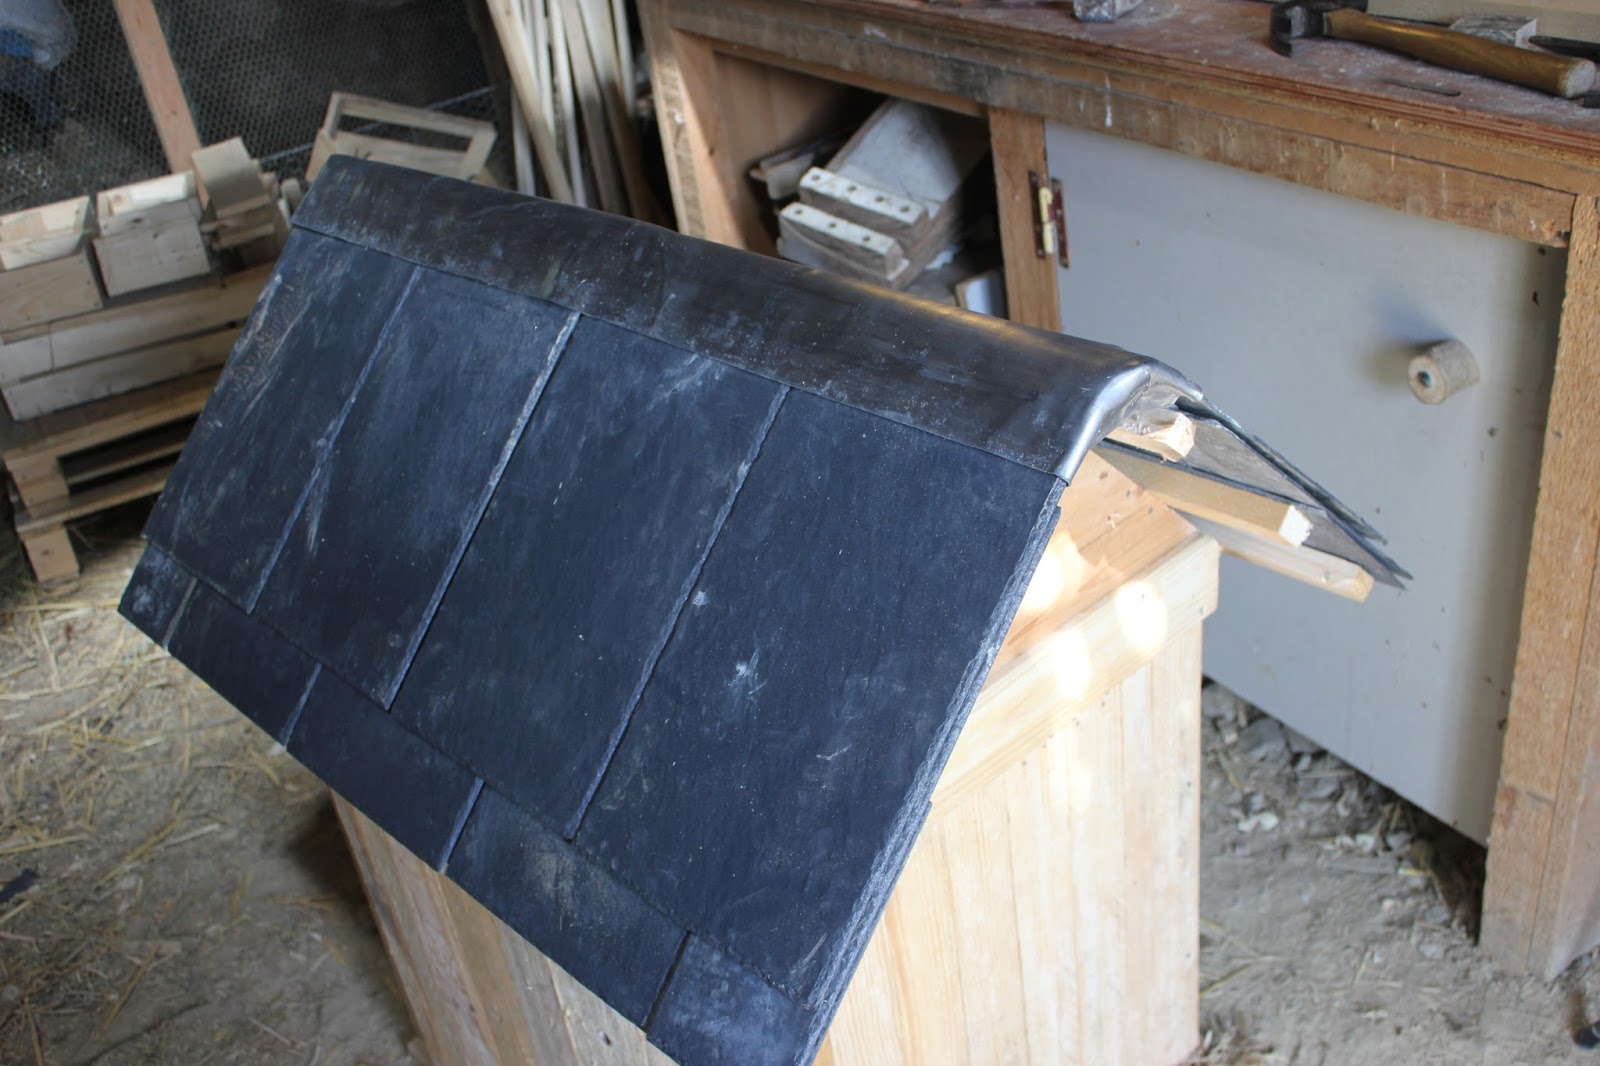
roof was constructed in a similar fashion to that of a house. The pitch
was 45°. The gable ends supported the ridge purlins/laths. The slates
were nailed to the laths using galvanised clout nails.

The gable ends were thus 90° triangles and comprised of pallet planks nailed to principal rafters.

 I made an end lapped joint at the top of
these rafters so as to furnish a flat face to which the gable end planks
could be nailed.
I made an end lapped joint at the top of
these rafters so as to furnish a flat face to which the gable end planks
could be nailed.

Each gable end rested on the top face of the East and West wall planks, one in line with the South wall and the other the North.

Pallet planks screwed to the outer face of the North and South walls served as the fixing face for the gable ends.

 Once the
carpentry was in place, I used a string running from the end of the
ridge purlin to the end of the bottom lath as a guide for the lateral
position of the slates.
Once the
carpentry was in place, I used a string running from the end of the
ridge purlin to the end of the bottom lath as a guide for the lateral
position of the slates.

For the first row of slates I also needed to ensure that they did not protrude into the path of the opening doors.

To this end I clamped a plank to the underside of the East/West wall planks. This was also the the upper limit for the doors on these elevations. Hence, provided the slate rested on this guide plank I was assured that the door would not be obstructed.


 Finally, I closed the gaps between the underside of the slate and the principal rafters by cutting and stapling fruit crate wood to the inside face of the rafter.

Wooden catches and handles were made for the doors.

A coat of linseed oil, tinted with four earth pigments, was applied. If you have never used these before, we have an article here
The hotel was furnished with a selection of pallet wood blocks, these had been drilled using a jig I had made for ease of 'mass production' I will link to it when I have made the film on it.

We also featured a beautifully figured dead branch from our friend's woodland.

Pine cones from the nearby sea shore and many dead flower/plant stems and stalks, drilled shrub branches, bamboos and dried leaves from our garden.
We also particularly added some length of giant bamboo to accommodate the glorious European black bee.

For detailed information on how and what to choose, sizes of holes to drill and tips on length and diameter of individual accommodation for specific arthropods please refer to our Luxury Insect Hotel design.

A layer of chicken-wire was fixed over the front of the insect house to protect it from birds, who both love to look for nesting materials, try to attach nests and/or eat the insects!

The wire was neatly held in place with some strips of fruit-crate wood.
For the installation of this insect hotel and the successful hiding of an eyesore, follow this link.
In the meantime, thanks for dropping by and if you have enjoyed this post please share and feel free to comment, ask questions or relate your own experience of the de-uglification of utility boxes.
All the best from sunny Normandie, Andy
© Andy Colley 2014
The gable ends were thus 90° triangles and comprised of pallet planks nailed to principal rafters.
I made an end lapped joint at the top of
these rafters so as to furnish a flat face to which the gable end planks
could be nailed.Each gable end rested on the top face of the East and West wall planks, one in line with the South wall and the other the North.
Pallet planks screwed to the outer face of the North and South walls served as the fixing face for the gable ends.
Once the
carpentry was in place, I used a string running from the end of the
ridge purlin to the end of the bottom lath as a guide for the lateral
position of the slates. For the first row of slates I also needed to ensure that they did not protrude into the path of the opening doors.
To this end I clamped a plank to the underside of the East/West wall planks. This was also the the upper limit for the doors on these elevations. Hence, provided the slate rested on this guide plank I was assured that the door would not be obstructed.
The slates for the first row were cut to half length so as to form the eaves row.
I drilled nail holes in all the slates prior to fixing. When fixing slates in the middle of the roof I found it necessary to support the lath behind where I was nailing with a lump hammer, I should have had a rafter in the centre to give a little more stiffness!
Prior to the last row of slates being nailed in place, I laid a strip of roofing felt over the ridge and on top of the penultimate row of slates to ensure the roof was weatherproof
I used lead flashing to cover the slates upper edges at the roof ridge.
Finally, I closed the gaps between the underside of the slate and the principal rafters by cutting and stapling fruit crate wood to the inside face of the rafter.FINISHINGS & FURNISHINGS
Wooden catches and handles were made for the doors.
A coat of linseed oil, tinted with four earth pigments, was applied. If you have never used these before, we have an article here
The hotel was furnished with a selection of pallet wood blocks, these had been drilled using a jig I had made for ease of 'mass production' I will link to it when I have made the film on it.
We also featured a beautifully figured dead branch from our friend's woodland.
Pine cones from the nearby sea shore and many dead flower/plant stems and stalks, drilled shrub branches, bamboos and dried leaves from our garden.
We also particularly added some length of giant bamboo to accommodate the glorious European black bee.
For detailed information on how and what to choose, sizes of holes to drill and tips on length and diameter of individual accommodation for specific arthropods please refer to our Luxury Insect Hotel design.
A layer of chicken-wire was fixed over the front of the insect house to protect it from birds, who both love to look for nesting materials, try to attach nests and/or eat the insects!
The wire was neatly held in place with some strips of fruit-crate wood.
For the installation of this insect hotel and the successful hiding of an eyesore, follow this link.
In the meantime, thanks for dropping by and if you have enjoyed this post please share and feel free to comment, ask questions or relate your own experience of the de-uglification of utility boxes.
All the best from sunny Normandie, Andy
© Andy Colley 2014

No comments:
Post a Comment